Parrilla Grill with Firebricks - Custom Outdoor Area Guide
In the heart of South American culture, an age-old cooking tradition thrives—Parrilla grilling. A staple of Argentina, Uruguay, and many other countries in the region, Parrilla grills have become synonymous with mouth watering flavours, rich aromas, and unforgettable gatherings. At the core of their popularity lies the unique grilling method, where fire bricks line the charcoal pan area to create a perfect balance of heat and flavour.
The charm of the Parrilla grill lies not only in its ability to prepare delectable meats but also in the spirit of community and celebration it fosters. Join us as we relive the journey of Jose, a customer who purchased a fire brick lined Parrilla Grill and built it into a beautiful outdoor setting, transforming the space into a centrepiece that we are sure friends and family will enjoy and admire for years to come.
➡ See our full range of Parrilla Grills for sale

Preparing the area and starting the brickwork
Starting with a sturdy concrete slab as the foundation, building an outdoor area with bricks offers both durability and timeless charm. The process involves laying the frame of the space, creating a solid structure that can withstand the elements while providing a warm and inviting ambiance. When embarking on the brickwork, there are essential factors to consider to ensure a successful and visually appealing outcome. Here are some key points to keep in mind:
- Planning and Measurements: Begin with meticulous planning and accurate measurements to avoid errors and ensure a seamless fit of the bricks.
- Brick Selection: Choose high-quality bricks suitable for outdoor use, as they need to endure exposure to weather conditions.
- Mortar Mix: Prepare the mortar mix correctly, ensuring a strong bond between the bricks for long-lasting stability.
- Brick Alignment: Pay close attention to the alignment of the bricks to maintain straight lines and consistent spacing.
- Leveling: Use a level to ensure the bricks are laid evenly, preventing uneven surfaces or potential tripping hazards.
- Brick Cutting: When necessary, cut bricks to fit specific areas neatly, using appropriate tools to achieve precise results.
- Expansion Joints: Incorporate expansion joints to allow for slight movements and prevent cracking due to temperature changes.
- Sealing: Consider applying a protective sealant to enhance the durability and weather resistance of the brickwork.
- Finishing Touches: Take the time for finishing touches, such as cleaning excess mortar and inspecting for any loose bricks.
By paying attention to these important details, your brickwork will not only add character and elegance to your outdoor area but also ensure a robust and long-lasting foundation for your outdoor living space.

A custom flooring solution for your outdoor living area
Creating a beautiful pebble or stone flooring is a fantastic way to enhance the natural charm of an outdoor space. With pre-made pebble or stone tiles, the process becomes more straightforward, offering convenience and efficiency while still delivering a stunning result.
The journey begins by: laying the frame of the area, ensuring a solid base to support the tiles. These pre-made tiles feature carefully arranged pebbles or stones, providing a smooth and uniform surface that is not only visually appealing but also comfortable to walk on. The tiles come in various designs and color palettes, allowing you to select the perfect fit for your aesthetic preferences. They are also ideal for achieving a quicker installation process, compared to custom pebble mosaics, which are intricate and time-consuming.
While custom pebble mosaics, often found in South American designs, boast unmatched beauty, they require more labor and patience, and they may not yield a completely smooth floor like the pre-made tiles.
Ultimately, both options can transform your outdoor area into a captivating retreat, but the pre-made pebble or stone tiles offer a more convenient and efficient path to achieve the same enchanting effect.
Jose went for the premade stone tiles and did an amazing job here. The floor reaches from the built in BBQ area to a custom wood seat that can be used to both overlook the cooking area while watching family and friends enjoy the pool. A glass divide elegantly separates the area, while allowing both sides of the partition to enjoy the view of the other side.

Brick rendering and stone tile overlay of outdoor custom BBQ area
Creating a custom stone-looking outdoor BBQ area through rendering bricks and overlaying stone tiles is a fantastic way to achieve a rustic and charming aesthetic. Here's a step-by-step guide to help you through the process:
- Preparation and Cleaning:
- Start by thoroughly cleaning the existing bricks to ensure the surface is free from dust, dirt, and debris.
- Repair any damaged or uneven areas on the brick surface and allow them to dry completely.
- Applying the Render:
- Mix the render according to the manufacturer's instructions. Typically, a cement-based render is used.
- Use a trowel to apply the render evenly across the brick surface. Aim for a thickness of about 5-8mm.
- Smooth out the render to create a flat and even surface. A straight edge or trowel can help achieve this.
- Allow the render to dry and cure for the recommended time, usually around 24-48 hours.
- Preparing for Stone Tiles:
- Measure the area and plan the layout of the stone tiles. This step is crucial to ensure a visually appealing pattern.
- Select the type and design of stone tiles that complement your outdoor BBQ area's overall theme and style.
- Overlaying the Stone Tiles:
- Apply a layer of tile adhesive onto the cured render using a notched trowel. Ensure even coverage to prevent air pockets.
- Carefully lay the stone tiles onto the adhesive, following your pre-planned layout. Press them firmly to set them in place.
- Use tile spacers to maintain consistent gaps between the tiles for grouting later.
- Continue the process until the entire surface is covered with the stone tiles.
- Grouting and Finishing:
- Once the adhesive has dried, remove the tile spacers and prepare the grout mixture.
- Apply the grout over the gaps between the stone tiles using a rubber float.
- Wipe off excess grout from the tiles with a damp sponge before it dries completely.
- Allow the grout to set as per the manufacturer's instructions.
- Sealing the Stone Tiles:
- Apply a stone sealer over the tiles to protect them from stains, moisture, and wear.
- Follow the recommended drying time for the sealer before using the outdoor BBQ area.
By following these steps, you can transform your ordinary brick outdoor BBQ area into a stunning custom stone-looking space that exudes charm and elegance. Enjoy your new outdoor oasis for relaxing, entertaining, and creating lasting memories with family and friends.

Installation of the Grill and custom finishes
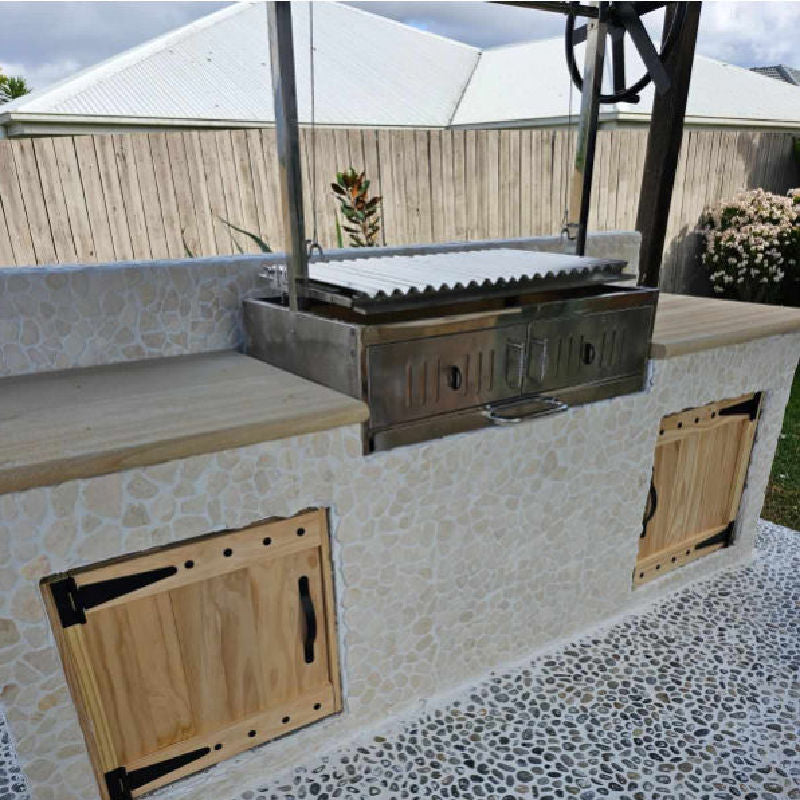
In the final stages of the area, Jose installed custom wood doors and put a finishing grout on the tiled areas for both the BBQ and floor. This provides a polished and smooth finish and blends the tiles in. The final result is amazing.
This is followed by placing the Parrilla BBQ with Firebricks into the designated area. The grill comes with legs and side trays, but they easily unscrew, allowing it to be built-in, like a traditional parrilla grill.
We can see from the photos the difference grouting the stone tiles on both the floor and in-built BBQ area makes. The wood doors are used to match the custom wood bench that overlooks the pool and BBQ area. the pergola roof allows the area to be used all year round, providing shelter from the heat and rain alike, as well as protecting the grill from the same elements. We still recommend maintaining the stainless steel with a polish and repair, when required.
Hats off to Jose, for bringing this bare concrete slab to life and creating an outdoor area we are sure he will enjoy for years to come.
 The first cook is always memorable and we bet Jose relished it, making all the hard work and effort worth while. We must say, the first cook looks the goods.

The Parrilla BBQ grill with Fire Bricks specifications
- Fuel Type: Charcoal | Heat Beads | Wood Fire
- Refractory: Fire Bricks | Lines 3 Walls
- Adjustable Height: Yes
- Moveable: Yes | Lockable Wheels
- Total Height: 1760 mm
- Fire Box Height: 810 mm
- Length without Side Trays: 900 mm
- Width: 600 mm
- Weight: 96 kg
- Length of Side Trays: 350 mm per side
- Width of Side Trays: 600 mm
- Weight: 96 kg
-
Grill Length: 860 mm
-
Grill Width: 520 mm
-
Product Link: Click here to see the Parilla BBQ Grill

You can view all our content blogs here!


Leave a comment