Skip to content
A whole pig cooking on a spit using the 1500 mm spartan Hood spit rotisserie

How To Cook A Pig On A Spit

Table of Contents

There's something undeniably primal and exhilarating about the age-old tradition of roasting a whole pig on a spit. The sizzle of succulent meat over an open flame, the smoky aroma wafting through the air, and the anticipation of a sumptuous feast - it's a culinary adventure that transcends time. In this blog post, we'll take you on a journey into the art of cooking a whole pig on a spit, from the initial preparations to the final mouthwatering result.

We'll explore the meticulous steps of preparing the pig, attaching all the necessary accessories to it, skilfully placing it on the skewer, indulging in creative stuffing ideas, expertly stitching the pig, and even mastering the art of starting charcoal for the spit. So, if you're ready to embrace the primal chef within, let's dive into the world of whole pig roasting, where fire, flavour, and tradition converge to create an unforgettable culinary experience.

Full Video Blog for a Whole Pig on a Spit

If you prefer to watch the process, you can see everything covered in this blog in the video below!

Preparing the Pig Before Placing On the Spit

Preparing the pig is a general term that has different meanings depending on how you source your animal. In this case, we will refer to preparing the pig from the moment you collect it from a butcher, meaning the animal is dressed (all organs removed, and animal is cleaned). We use the following ingredients when preparing the pig:

  • Olive Oil: Around 1L – 300-500 mL will be used for basting the animal during the cook.
  • Table Salt: 1kg of table salt.
  • Pepper: 200 grams of pepper (1 part pepper for every 5 parts salt).

We highly recommend preparing the pig the night before the cook and keeping it wrapped (or in a bag) inside a fridge (or on ice in a large eski). If you can’t do this overnight, you should aim to do it 2-3 hours before starting the cook. Preparing the cook is easy using the following steps:

  1. Tip the pig to remove any excess blood from the animal.
  2. Dry the outside and inside of the animal using paper towel. You want to do this thoroughly. Removing all the moisture, especially from the outside, will help with the crisping of the skin (often known as crackle).
  3. Coat the inside and outside of the animal with olive oil. This only need be a light layer. Also, this step isn’t compulsory, you can salt the pig without adding olive oil
  4. Generously coat the pig with salt. You can comfortably use 1 kg of salt for a 17-20 kg pig (dressed). Coat the inside and outside of the animal with more being used for the outside than inside.
  5. Coat the outside and inside of the animal with pepper. As mentioned, you only need 200 grams of pepper for 1 kg of salt. If you don’t like pepper you don’t need to do this but we recommend it.
  6. You can also replace salt and pepper with a premade rub designed for BBQ or spits. For example, rub packs shown here are a mix of salt and spices and are amazing on whole pigs. If you are feeling a little fancy or want to try something different, give these a go!

Preparing the Charcoal for the Spit

If you are using a gas spit, you can skip this step (lucky you? Or for the lovers of that charcoal cooked meat… boo!)

At this point, if you are using a charcoal spit, you may want to get the charcoal started as it takes 20 to 30 minutes to burn in. If this is your first time, you could attach it to the spit first, stuff it, and stitch it up as shown in the next sections but all those steps shouldn’t take more than 30 minutes (especially if you have prepared the pig with salt or rubs the night before).

There are multiple ways to get the charcoal started. You can use a Chimney, which typically hold 5 – 8 kg of charcoal. You simply use a few fire starters under the chimney and let the charcoal inside burn for 20-30 minutes. After this you pour the Charcoal into the pan and add fresh charcoal alongside the pre-lit sections. We have a short video showing two chimneys with the charcoal inside below:

If you don’t have a chimney you can get the charcoal started directly in the charcoal pan. We tend to make 3-4 small piles with fire starters underneath them. Again, this method will take 20-30 minutes for the charcoal to be fully burning and we add fresh charcoal alongside it to fill the gaps.

It is important that when adding fresh charcoal throughout the cook that you add it to the side (and touching) the burning charcoal. If you add it directly on top you can produce smoke quickly and/or smother the burning coals. You don’t want that to happen, so always add it to the side of the charcoal already burning!

Putting the Pig on the Skewer / Spit

The next step is placing the animal on the spit. You can see how this is done visually in the video within this blog under the Video blog section. A short video on the accessories required for a whole pig can be seen below:

How these accessories are attached is shown in the following step by step guide:

  1. Attach the spine brace to the pig:

A single spine brace will do the trick for small to medium sized pigs up to 19 kg. The brace is placed halfway between the pig to secure the spine in place.

If the pig is 19 kg or over, you might need to use two spine braces. In this case the braces would be placed every third of the spine.

You may need to use a knife to cut small holes so the prongs can easily exit the skin on the outer side. Once the prongs are pushed through, place on the plate and lightly screw the wing nuts in place.

Check out the short video below:

  1. Once the spine brace is in place, the skewer is inserted from the back, through the middle, making sure to loop through the spine brace, and out the mouth of the animal. Centre the skewer so an even amount is sticking out either end. If you are using a smaller spit, such as a 1200, spacing is important. You can adjust the skewer position as you apply the other accessories in the next steps. You may have to force the pig’s mouth open, taking care as the teeth on pigs are quite sharp.

  2. Tighten the previously applied spine brace to the skewer so it is tight and holds the skewer in place. Do not over tighten the brace as the spine can break during cooking and the meat will sag either side. The brace just needs to be enough that the skewer can still move but is tight.
    A short excerpt showing the skewer being placed in and the back brace tightened is available below:

  1. Put on the back large prong. In this step a large prong is placed onto the skewer and pushed into the back of the animal. The prongs should be lined up into the meaty hip bone area and pushed all the way in, so no prong is visible. Tighten the prong with the screw onto the skewer.
    See a short video on the process here:

    1. The next step is attaching the remaining large prong to the front of the animal. Here the prong is placed on the skewer and pushed through the mouth of the pig. The pigs’ cheeks might need to be cut to the back of the jaw so that as much of the prong can be placed into the shoulder meat as possible. For this front prong, a mallet or hammer is quite often required to complete the process. See the below video showing how the front prong is attached:

      1. The last accessory required is the leg brace for the back legs. The leg brace is attached to the skewer and pushed right up to the back of the back large prong. Tighten the leg brace in place onto the skewer using the screw supplied.
        The legs are then manoeuvred to sit on the outside of the leg brace (inside the natural V shape of the brace). There is no need to tie down the legs. The natural muscles in the animal will hold them in place. A detailed video showing this is provided below:

        1. Depending on how you receive the pig from the butcher, you may need to secure the front legs to the front large prong which was inserted in step 5. You can use stainless steel wire to achieve this and a single loop around each leg to the corresponding prong will do the trick. This is possible because there will be exposed prong in the gap between the back of the jaw and the shoulder meat where the front prong is inserted in.

          At this stage the pig will be fully attached to the skewer, and you can double check to make sure all the accessories are tight to the skewer. No need to overtighten them as you can damage your accessories or break the spine during the cooking process.

          Stuffing the Pig

          At this point, you will need to stuff the belly cavity of the pig. Again, there is multiple ways to do this but our favourite (which is also very easy) is to use apples and onions. For a 17-20 kg pig the following ingredients will be required:

          • 1.5 - 2 kg of apples, quartered or halved.
          • 1.5 - 2 kg of onions, quartered or halved.
          • Garlic cloves or powder (optional)
          • Other spices or herbs you want! (optional)

          Once the apples and onions are cut into halves or quarters, completely fill the belly cavity with both. You can mix through the garlic cloves/powder and other herbs or spices as desired. We really stuff them in here, but make sure you can grab enough of the meaty belly opening either side so you can stich the belly up. You want to be able to stitch it up without it tearing through.

          Check out the quick video excerpt from the main video blog below:

          Stitching the Pig up After Stuffing

          Once the animal is stuffed, you will need to stitch the belly up to keep the stuffing inside. To do this, you can use a thin stainless-steel wire. It is relatively cheap at $1-2 per metre. The stitching should be no more than 1 inch (2.5 cm) apart. Use the meaty section across the belly, so half an inch (1-2 cm) from the cut. Don’t pull the stitches too tight. You don’t want them to start tearing at the meet. You just need enough so the contents don’t fall out and juices are trapped inside.

          Placing the Ready to Cook Pig on the Spit

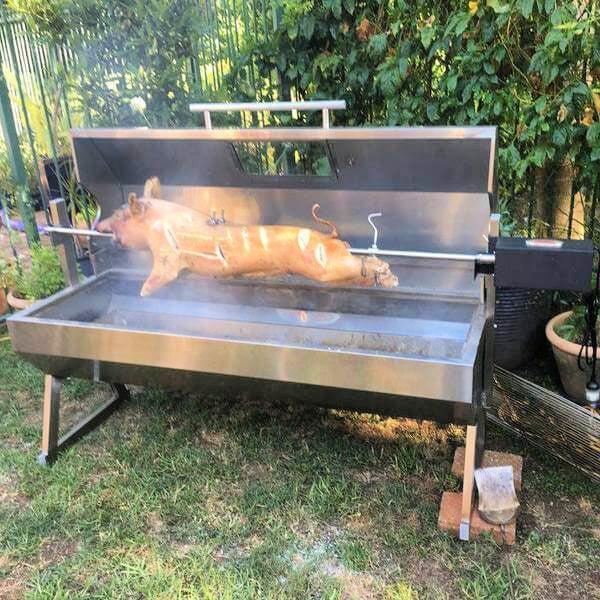
          Once all the steps above are complete, it’s time to put the skewer on the spit, attach the skewer to the motor, and get the pig rotating. We have a short video below but the important things to consider when doing this is:

          • If your spit is adjustable in height, start with it at the highest setting. This is because the charcoal will start to quickly cook the outside of the pig if you have it set to low while attaching the skewer.
          • Make sure the pin is securely attached between the skewer and the motor.
          • Lower the skewer to the right height above the charcoal. Typically, if you can keep your hand at the bottom of the meat for 6-8 seconds before removing it, you are at a good height. If you can keep your hand there longer, lower the skewer, if you can’t keep it there for this long, raise the skewer.

            Basting the Pig When on the Spit

            Every 20-30 minutes you should baste the pig. You can use any baste you like. For our basting suggestion you will need the following ingredients:

            • 500 mL of Olive oil (this is taken from the 1L recommended from the start)
            • 500 mL of lemon juice – freshly squeezed or from a bottle, depending on time

            Mix both lemon juice and olive oil in a 1:1 Ratio. You can do this from a bowl and use a basting brush. However, we find the easiest method is using a water spray bottle. They are extremely cheap (around $2) and we mix the lemon and olive oil into one and spray it onto the pig every 20-30 minutes. Simply shake the bottle each time before use, as the olive oil and lemon juice will split based on their densities.

            Cook Duration for a Pig on the Spit

            For a whole pig, cooked over charcoal, you are looking at 6-8 hours. You could have the pig lower to the charcoal and get it done in 4 hours but the meat will be much juicier and the skin more cracklier (is that a word?) if you do it longer. To achieve this use the following method:

            1. For the first 30-45 minutes, have the pig sit so that your hand can only stay above the coals for 5-6 seconds when placed at the bottom of the pig.
            2. After the first 20-45 minutes, raise the pig so your hand can now keep it there for 8 seconds above the coals. Keep it like this for the remaining 7 – 7.5 hours
            3. In the last 30 – 45 minutes lower the pig so you can only keep your hand above the coals for 4-5 seconds.
            4. Baste the pig (as shown above) every 20-30 minutes.
            5. To get the perfect crackle, see below

            Making the Perfect Pork Crackle

            Now for the most important part! That perfect crackle. Ideally, you start the pig low and raise it over the duration of the cook. The following steps is a good guide for a 17 – 20 kg pig.

            • Follow the steps shown in the Cook duration section above
            • At the end of the cook, the skin will be removable in sections (or 1 very large section if you didn’t score the pig to begin with – which is perfectly fine!). Remove the entire skin from the pig.
            • With the skin removed, if you have a BBQ grill that can sit on the spit, lay the skin out evenly on the grill above the charcoal. The grill will naturally be at the lowest point above the charcoal. Grill the skin until it goes a light brown colour and super crispy!
            • If you don’t have a BBQ grill or don’t want to do it above the charcoal a super easy and reliable way is to place the skin on baking trays and put them in a conventional oven. Turn the oven to full heat and cook for 5 minutes. Keep an eye on it so it doesn’t burn! It doesn’t take long, and the skin will come out golden brown and perfectly crackled.

            Conclusion

            And there you have it! An in-depth guide to cooking a whole pig on the spit, from preparing all the way through to basting during the cook. During the cook all the apples and onions packed inside will break down and the juice will permeate the meat from the inside out. This method will guarantee a perfect, juicy pig the whole way through. All the meat will be perfectly cooked and moist. By following the crackling guide section, you will also end up with the best crackle you have ever had! Its light and super crunchy! No chewy parts to be found.


            You can also see a FAQ related to this article by following our Spit Roasting a Whole Pig | FAQ link.


            If you need to know anything else spit related, you can read it all in our ultimate spit roaster rotisserie guide. Your one stop destination to the world of spit Roasting!

            Author Bio Image

            Ryan Wright

            Ryan Wright is a chemical engineer and metallurgist with a passion for outdoor living. He has an ongoing love for research and is well experienced in whole animal spits, fire pits, and parrilla grilling.

            Previous article Hooded Spit as a Charcoal Oven | Users Guide
            Next article Spit Roaster Maintenance Guide

            Leave a comment

            Comments must be approved before appearing

            * Required fields